Ask Elizabeth, Family, Photo Projects, Photography
Creating Albums for your Photos & Why I Make a Family Yearbook

Ask Elizabeth: How to you go about printing photos for yourself? Is there a method to the madness? I want to make albums but not sure how to start! How do you organize them?

What a fun question! I am excited for this blog post. Printing photos and making memory books for our family is one of my favorite things to do with the crazy embarrassing amount of photos I take! I print family photos for frames around the house (like this), I print them small and use them for bookmarks or pinned on the fridge, and I post tons of them here online! I love Photo Projects and have a whole bunch of them on my blog, but our family yearbooks may just be my favorite!
I made my first yearbook for 2016 with Mixbook, before we even had any kids, and I was hooked! I realized how perfect it was for taking all the photos of the big things and little things that year and chronicling them in an easy to digest format. Since having children, these books are even more of a treasure to me. Everyone – parents, cousins, kids, grandparents, friends, even first time guests – love picking one off the shelf and pouring through the pages. As the years pass by, it is hard to remember what year we went on a Disney vacation let alone a random trip to the zoo or craft at home, but these books remember and show them off “live in technicolor!”
But let’s get to the details – how do I go about creating a yearbook for our family every year? Today I am going to share with you my tips and plan to create these family heirlooms so that you can create them for your family too!

Organize Photos
One of the things that helps immensely before I even open up Mixbook to start my yearbook creation, is having my photos organized. When I upload images to my computer, I add them to the correct year, month, and then further sort into labeled albums. Because nearly all of the photos in my yearbook are ones from our cameras, they start in RAW format and I need to cull through each album, editing my favorites, and exporting them in the folder as edited. All these steps need to be finished before I can upload images to my yearbook.
You may not be using camera photos for your yearbook or you may be trying to use a combination of phone and camera photos, but it is always good practice to have well organized photo files so you can find things again as time marches on and easily be able to add them to your yearbook.

Start a New Book
Once my photos are all edited and organized, I am ready to start a new book. I do this first by logging into my Mixbook account and creating a copy of the previous year’s yearbook. As much as I can, I try to make our yearbooks the same each year so that they fit the same overall feel and look. Mixbook has changed some details over the years, but they still are similar. I wanted a super simple format when I first made my yearbook – there are no text boxes, just spaces for photos and labels for each month of the year. This makes it easy to redo year after year, by simply plugging in the new photos.
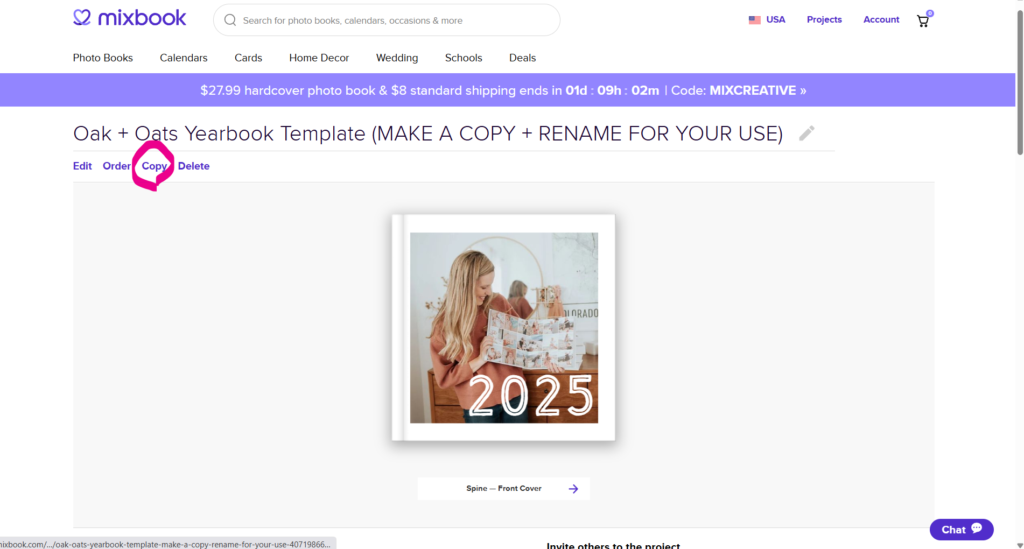
If you are starting on your first family yearbook and want to use my template, I can share the template with you! All you have to do is click on THIS link. Once you are there you click on COPY and rename the template for your own account. Do not add photos to this template as I WILL have to delete them so that people can continue to use it.
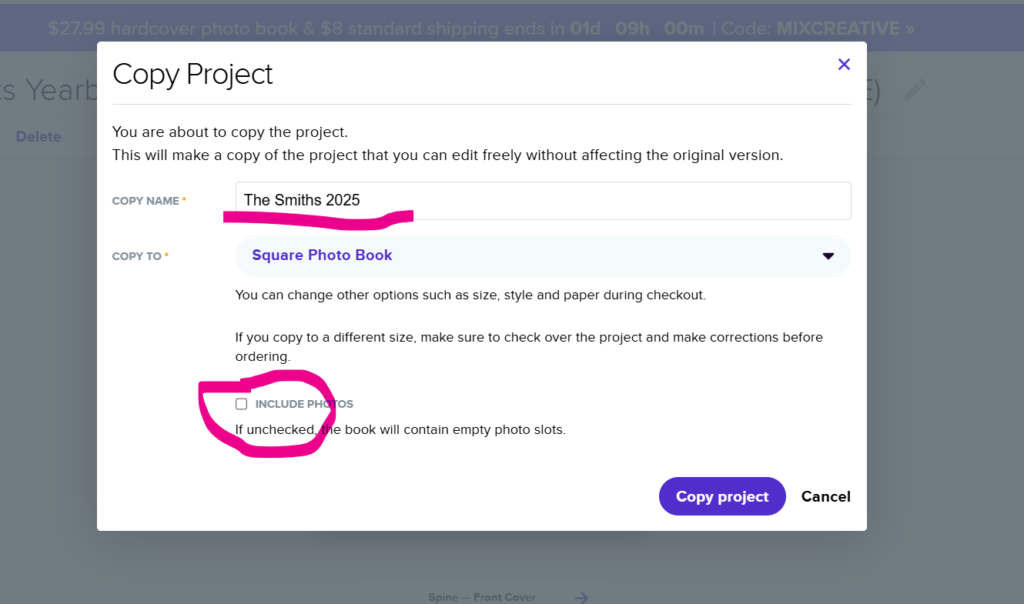
PS: When you copy your yearbook over for another year, make sure that you uncheck “include photos” so that you are starting with a blank slate. I also like to change the name right away at the top so that you know it is for the new year – ex. 2023 Yearbook.

Upload a Month at a Time
Ideally, you do this after each month of the year so that when January 2025 hits, you can add the yearbook to your cart and check out! However, as we all know, that isn’t always the case. It’s months into 2024 and I just finished and ordered 2022, 2021 is sitting halfway done in my account (I can’t remember why I switched to doing 2022?!?! haha!) and 2023 is waiting to be done. But no matter what year I am working on, I upload images a month at a time. This allows me to see all the images from a month at once and figure out where to put them in my book. Some events will take up two pages, others four, and some will share a page with another set of photos.
You can add pages to certain months and swap out photo templates if you need more or less photo spaces. But it is important to remember that you only get 99 pages if you want to do a lay-flat album like the ones I make. I try to let months be smaller if I don’t have tons of content for them, so that I can let any month with a family vacation get another extra couple pages!

Pick Your Photos
You may be shocked to realize that I still don’t include every photo in our yearbooks. I occasionally have to leave out whole folders of photos for the sake of space. And nearly every time, just pick out some of the photos to represent the time in our yearbook. When choosing what makes the cut, I usually pick my favorites – the ones I think turned out the best. But I also prioritize the ones with people, friends, and family. If I am choosing between photos, I choose the one that has more people or includes a grandparent over a cute kid alone. These yearbooks are not necessarily snapshots of my best photographic work, but more so, the pictures of the people in my life and our stories. Photos like the ones included in this blog post will never be included in a yearbook. We don’t need to remember this photoshoot, but we do need to remember the random photos I took of the girls in dress up just before these ones!
When you are choosing the photos for your book, think about what you will want to remember. It is important to include the big things like birthdays & vacations, but also just as valuable to include the photos from cooking together in the kitchen, the Lego towers (and messes), and the snapshot you took of your kids sleeping the car while holding hands, because it melted your heart!

Order the Book
Once you have finished adding every month to your yearbook, add it to your cart. I tend to leave it there until I see a sale from Mixbook for 40%-50% off. These yearbooks can be pricey but they are worth it!
This is not my first blog post sharing our yearbooks so if you are interested in reading more:

PS: Ask Elizabeth is a series of blog posts where I answer your very real questions! So much of my blog is me sharing things I want to share (as you may expect) but in these posts I get to spend time answering questions you have! These are always so fun for me and I love to write them so if you have a question for Ask Elizabeth, leave it in the comments below or click here and fill out the form!