How I Edit My photos for my Blog & Instagram
 I switched up my editing style last week and it is more noticeable to some people than others – mostly me! It feels like a huuuuuge change and that is mostly because change scares me and I have this illogical craving to do everything right & perfectly the first times. I texted all my friends in a panic to make sure I wasn’t going to lose followers with the new way I started editing my pictures. It sounds a bit crazy right?! But maybe next time you find yourself in a similar situation you will know you are not alone 😉
So I switched things up and I posted about in on Instagram and shared a couple of stories about it all. People were being so kind and encouraging and asking how I did it so I shared about that and then I got even more questions about presets, terminology, and how I really edited pictures! Don’t feel bad if you don’t know about cameras, RAW settings, or presets! I want to share how I edit my pictures with you and some of the terminology behind it all!
Before I dive in, I do want to point out that most of my Instagram photos come from my camera not my phone. There are a couple reasons for this. 1. I want brand constancy. 2. I want to show you work and photos I’m proud of 3. I like the way it looks better. Just because Instagram is a phone app does not mean that you only can use your phone to share. If you only have your phone then work with what you got! There is nothing wrong with phone photos! BUT if you want to use the images you create for your blog and the style you use on your blog also for Instagram – there is no shame at all! I like the way my DSLR photos look and so that is what I use!!
SHOOT IN RAW
I start every photo on my blog or Instagram by shooting in RAW on my NIKON D700. I used to have a Canon Rebel before this and I also shot with RAW on that. You can shoot in RAW on every DSLR (full frame or cropped sensor camera.)
RAW: Large, unedited photo files. They need to be uploaded and edited into jpeg before sharing these images.
Shooting in RAW gives you more data to work with. You are able to fix images in editing and are able to bring out different colors and elements you want. If you want to edit you photos at all, shooting in RAW is what you need to do!
PS: If you don’t have a DSLR but you want one, look on Amazon or craigslist for a good deal. The Rebel is a great place to start. It will really up your blog and Instagram photography!
EDIT IN LIGHTROOM
When I first got into photography, I thought you could only edit in Photoshop. Good news for us normal people, that is a thing of the past! You can still use and rock Photoshop for editing if you want but Lightroom is MUCH easier to use. You can batch edit, upload presets (we’ll get to this soon), and play with really easy sliders.
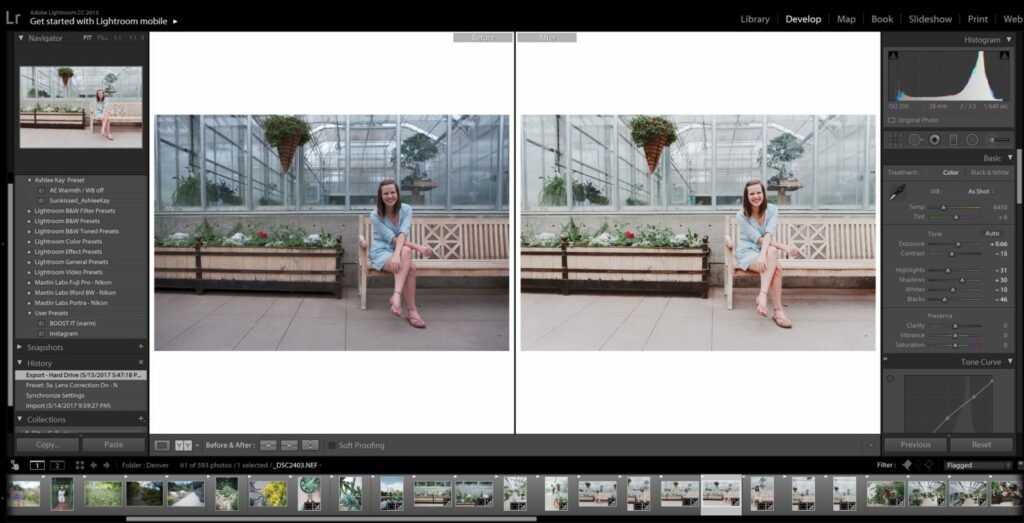
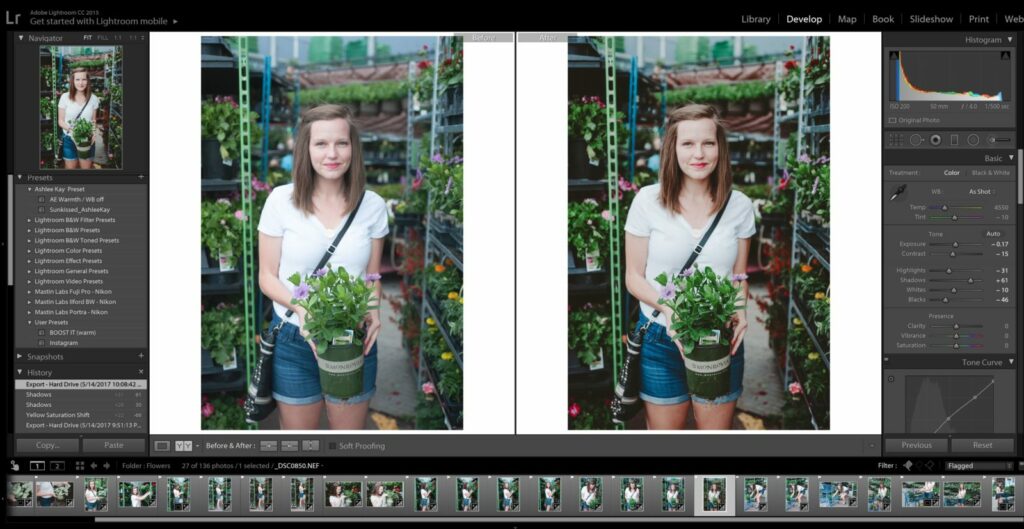
Once I upload my photos into lightroom, I click through and “flag” all the keepers. The I sort by flagged (bottom right) and only edit the good ones! I took a couple before & after screen shots showing how the RAW photo looks before I edit it. The thing to note is that the RAW images come in pretty flat and dull. This isn’t because it is a bad photo, it is just because there is so much data there and you can bring out the parts that you want to!
First I fix the white balance with the “temp” and “tint” sliders in the top right. I usually base this on skin color. Then I add my a preset that I created for my images so that I can try to keep consistency. This mostly brings up the blacks and some colors. Last I use the exposure, highlights, and shadows sliders to get the desired brightness. I love having a saved preset so that I can slap it on and then fix it according to the image!


Use Presets
Like I mentioned above, I use a preset that I saved of my editing actions. I actually modified a preset from Ashlee Kay Photography that I bought for $10. If you are playing around with editing, buying and downloading some presets may be helpful in showing you how to manipulate your images to get the look you are going for!
PRESET: A set of saved actions in photoshop or lightroom that you can apply to your image at once.
Places you can get presets:
- Mastin Labs
- VSCO
- Ashlee Kay Photography (email ashleekayphoto@gmail.com if you want to snag the one I bought!)
- Jenna Kutcher
You can also always save your own set of actions as a preset to help you edit future images and be consistent in your editing style!
I hope that helps you see how I edit my images and how I try to keep a consistent style! Please feel free to reach out to me on Instagram @oakandoats or leave a message in the comments if you have any other questions or thoughts!
Photo Credit: Ashlee Kay Photography

I love seeing your behind the scenes.
Im totally one of those people who jump between shooting RAW and shooting JPG haha. It all depends on the type of shoot
Thank you for sharing! I loved this post. I’ve been struggling with finding consistency. It’s hard because I love so many different filters and styles. Great points here!
Thanks so much for sharing! If/when you occassioally use your phone for an IG picture, how do you keep the editing consistant when most photos are shot from your camera and edited in lightroom?
Nellie!
Yes, when I do use a phone pic I send it to myself via email and download it on my computer to upload it to Lightroom. It makes it a bit more of a step but I love to keep the editing consistent!